# NETTS API Review and Guide
Whether you need to make one USDT transaction a week or one thousand per day – you definitely don't want wasting time and resources on something that trivial: ideally, you'd like your transfer to just magically happen. Without any staking, without delay or overpaying.
Of course, TRON network came up with concepts of Energy and Bandwidth in order to help the users, but the way their current native execution might seem really expensive, slow and inconvenient for those who prefer speed and reliability at all times. Staking requires you to freeze enormous amounts of TRX, which locks your funds away from you. And when it comes to GasFree feature, even though it simplifies things, it's still extremely expensive compared to renting Energy.
The only way to forget about any problems related to any USDT transfers is to delegate the entire process to a specialized Energy renting service such as NETTS: its robust Workspace will allow you to reliably get as much rented Energy you need at the lowest prices on the market and according to your own schedule.
Alright, but where does the API come in? NETTS API allows you to go even further: fully control the entire process through fetching tons of data related to your Energy refill needs and even send requests for 1-hours Energy refills programmatically!
The API (Application Programming Interface) is absolutely crucial for any cutting-edge Energy renting service in terms of client-service interaction efficiency. Instead of clicking buttons and filling out forms, you can explain your preferences in detail to the NETTS server, after which it will charge you for transactions exclusively according to the energy replenishment algorithm you created.
Whether you are an enthusiast, developer or business owner – the tools of NETTS API will allow you to reliably get as much rented Energy you need at the lowest prices on the market, completely automatically and 24/7 while keeping your hand on the pulse of your crypto transactions.
# What Are the Benefits of NETTS API?
NETTS programming interface enables the owner of even the largest cryptocurrency business (platform, site, exchange, etc.) to control the Energy rental process in real time.
Of course, unlike Workspace (the personal dashboard of NETTS clients), which can be used without special training, API requires some experience in programming or a desire to study its basics - especially since modern AI significantly simplifies the process of learning from scratch.
And for those who have such experience, NETTS has made the task easier by providing examples of using API methods in 3 popular languages at once – JavaScript, PHP and Python. And if your favorite language is not among these three, don't worry - the methods given in this guide are applicable to any programming language.
We are sure that you will not regret the time spent, as the following important opportunities for running a business will open up before you.
- Checking current prices for Energy in real time.
- Access to information about your account - the state of funds on the deposit, the amount of savings compared to staking, the total amount of delegated Energy, etc.
- Renting Energy for 1 hour through the 1-Hour Energy Order Endpoint.
That is, NETTS API allows you to conveniently integrate Energy rental and management functionality into your own applications, providing full control over the automation of the Energy rental process.
# Methods of Interaction with NETTS API
All requests to the NETTS API require authentication using an API key. Once you have the key, you will be able to verify your requests and use endpoints. Let's look at each of these steps in more detail.
# Getting an API Key
To get your API key, simply generate the key in the API section of your Workspace dashboard: https://www.netts.io/workspace/dashboard.php?tab=api (opens new window)
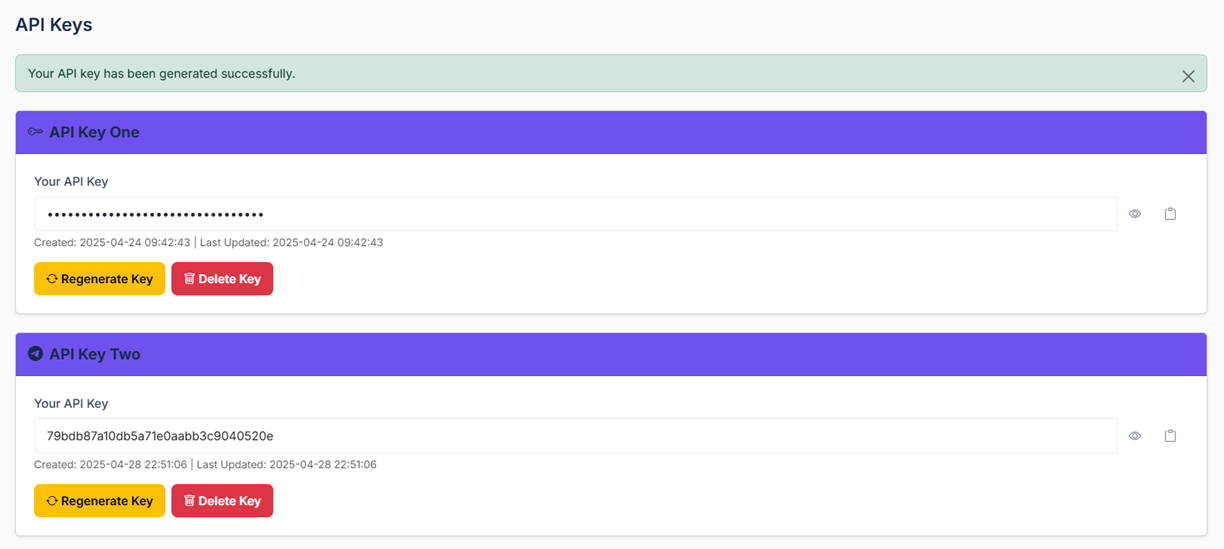
There are two versions of the key, we recommend using the v2 version for ultimate control.
# Request Authentication
To access any information via API NETTS, you must present the "pass" - the API key issued to you. Without it, even correctly written code will be useless. Therefore, each of your algorithms must include the following request header:
X-API-KEY: your_api_key
NETTS offers users two types of API keys.
- Regular API keys. They are universal and provide the ability to integrate into any software environment. They require a white list of IP addresses.
- TG API keys. Highly specialized keys for integrating Telegram bots. No IP whitelisting required. They can be obtained by sending a request to [email protected]
For security and stable operation of the server, a limit on the number of requests per second has been implemented: 2 requests per second for 1 API key. If this limit is exceeded, the API will return the status code 429 Too Many Requests.
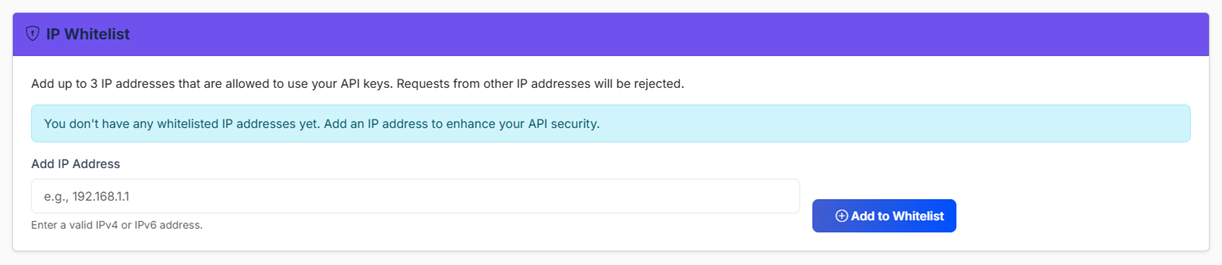
And to protect its customers, NETTS uses a whitelist of user-approved IP addresses in the API to communicate with the NETTS server. All of these, of course, must be associated with your API key. Therefore, before interacting with the API, be sure to disable any unwanted VPNs and proxies on the computer or server from which you send requests.
After receiving the keys in the same section - https://www.netts.io/workspace/dashboard.php?tab=api (opens new window) – fill in the IP Whitelist using valid IPv4 or IPv6 addresses:
The level of security of access to the API also largely depends on the user – try to follow a number of simple protection rules:
- do not share your API key information;
- do not include the API key in your client code under any circumstances;
- change API keys regularly;
- add only IP addresses that actually belong to you to the white list, avoid using public WiFi hotspots, rented proxy addresses to which you may lose access;
- monitor code execution to identify and prevent bugs.
# How to Use NETTS API Endpoints
An endpoint is the final point of a client-server interaction route/chain, where information is sent or requested, a kind of destination or departure point for data.
The base URL for all endpoints in our API is:
https://netts.io/apiv2/
In NETTS the following API points are available:
GET https://netts.io/apiv2/prices – provides information around the clock and in real time on all prices and transactions related to Energy rental;
GET https://netts.io/apiv2/userinfo – provides detailed information about the balance, service usage statistics, and network information.
POST https://netts.io/apiv2/order1h – allows you to programmatically rent Energy for 1 hour.
Below are more details about each endpoint.
# Prices Endpoint
After authentication via the API key, the Prices endpoint will be available for use. The following information will be provided in full in response to the user's request:
- request status ("success" or "error") –
status(string type); - current UTC time –
current_utc_time(string type); - current active time period –
current_utc_hour(integer type); - list of pricing periods –
periods(array type); - active pricing period –
active_period(string type); - time of the last price update –
last_update(string type); - current host price in TRX –
host_price(number type).
So-called response parameters, such as “status”, “current_utc_time” and the like, are sent to the user in the parameter:information JSON format. That is, the information is provided in readable form, which allows identifying possible errors, storing information for correction and easily exchange code with other developers.
This is what our end goal looks like:
{
  "status": "success",
  "current_utc_time": "2025-04-23 14:30:45",
  "current_utc_hour": 14,
  "active_period": "11:00-21:00",
  "last_update": "2025-04-23 14:15:22",
  "host_price": 0.075,
  "periods": [
    {
      "label": "Early Morning",
      "period": "05:00-07:00",
      "is_active": false,
      "prices": {
        "less_than_200k": {
          "price_sun": 420
        },
        "equal_131k": {
          "price_sun": 410
        },
        "more_than_200k": {
          "price_sun": 400
        }
      }
    },
    {
      "label": "Morning",
      "period": "07:00-11:00",
      "is_active": false,
      "prices": {
        "less_than_200k": {
          "price_sun": 450
        },
        "equal_131k": {
          "price_sun": 440
        },
        "more_than_200k": {
          "price_sun": 430
        }
      }
    },
    {
      "label": "Day",
      "period": "11:00-21:00",
      "is_active": true,
      "prices": {
        "less_than_200k": {
          "price_sun": 480
        },
        "equal_131k": {
          "price_sun": 470
        },
        "more_than_200k": {
          "price_sun": 460
        }
      }
    },
    {
      "label": "Evening",
      "period": "21:00-23:00",
      "is_active": false,
      "prices": {
        "less_than_200k": {
          "price_sun": 440
        },
        "equal_131k": {
          "price_sun": 430
        },
        "more_than_200k": {
          "price_sun": 420
        }
      }
    },
    {
      "label": "Night",
      "period": "23:00-05:00",
      "is_active": false,
      "prices": {
        "less_than_200k": {
          "price_sun": 400
        },
        "equal_131k": {
          "price_sun": 390
        },
        "more_than_200k": {
          "price_sun": 380
        }
      }
    }
  ]
}
As you can see, this code fragment already has parameters that you are familiar with: “last_update”, “host_price”, and others. But what about “is_active” or “less_than_200k”? The first parameter refers to the “periods” arrays, and the second to the “prices” object, both of which we will examine below.
Let's start with the “periods” array. It contains the following parameters:
- human-readable label for the period –
label(string type); - time range in the format " HH:MM-HH:MM" –
period(string type); - whether this period is currently active –
is_active(boolean type); - information on prices for various volumes of Energy –
prices(object type).
As you may have noticed earlier, user of NETTS API can request information about more than one period at a time. In doing so, he will receive the 4 categories of information described above. Of particular interest to us is the last category – “prices”. The type of this parameter is an object, and this object itself contains three parameters that will always be presented to the user in the final response from the server.
Moreover (try not to get confused!) each of these three parameters contains one integer type.
So, the total list of objects from the “prices” object inside each “periods” array will look like this:
- prices for Energy with a volume of less than 200k –
less_than_200k(object type); - prices for Energy with a volume of exactly 131k –
equal_131k(object type); - prices for Energy with a volume of more than 200k –
more_than_200k(object type);
As for the parameter that is “living” in each of these objects, it’s the one providing the user with the desired number - the price in SUN. It only makes sense that it is called price_sun, and its type is integer.
Now that we have decoded the server response code above, let's figure out how to get this response.
The process of creating a request depends on the programming language you use. We will not give a short course in any language here - we will only give an example of a correctly composed request in the popular language called Python. The simplicity of the request is obvious even for beginner programmers - such a request can be implemented in any other language: we will provide the links to more examples at end of this guide.
import requests
import json

# Request configuration
url = "https://netts.io/apiv2/prices"
api_key = "your_api_key"  # Your API key

headers = {
    "Content-Type": "application/json",
    "X-API-KEY": api_key,
    "X-Real-IP": "your_whitelisted_ip"  # IP from your whitelist
}

try:
    # Send GET request to the prices API
    response = requests.get(url, headers=headers, timeout=15)

    # Process JSON response
    if response.status_code == 200:
        data = response.json()
        print(json.dumps(data, ensure_ascii=False, indent=2))
    else:
        print(f"Error: {response.status_code}")
        print(response.text)
except Exception as e:
    print(f"An error occurred: {str(e)}")
Of particular interest to us in this fragment is the dictionary named “headers”. The code goes to it after the necessary imports and assigning the required address and key to the string variables. Dict “headers” includes request headers that ensure a correct request to the server. Such headers are used only on the client side and allow additional information to be sent to the server via the HTTP protocol.
In our case, a mandatory combination of API key and allowed IP address (from the white list) is required:
X-API-KEY
X-Real-IP
The third one - Content-Type - is not necessary as it simply clarifies the request, explaining to the server that the response to the request should be received in JSON format. However, it makes working with the server much easier and is therefore recommended for use.
Next, the code tries to request the specified data only if the status code is 200, and if something went wrong, it requests the error code from the server. If nothing works at all, it goes to the exception block.
For debugging NETTS API provides the following status codes for error responses:
- 401 - authentication error (invalid API key or IP address not in the white list);
- 403 - access denied (IP address is not on the white list);
- 429 - request limit exceeded (too many requests);
- 500 - internal server error.
An example of an answer with an error (in this case, the second one in the list):
{
  "status": "error",
  "code": -2,
  "msg": "Your IP address is not whitelisted"
}
When analyzing the information provided by the server in response to your request, please consider the following points:
- time is given in UTC format;
- prices are indicated in SUN (1 TRX – 1000k SUN);
- and the active period is determined in accordance with the current time in UTC format;
- prices may be updated several times a day.
# User Information Endpoint
Let's move on to the /userinfo - the principle of interaction with it is the same as with the previous endpoint.
We need a response from the server in JSON format, which will provide various information about the user's account in a form we can understand:
{
  "status": "success",
  "timestamp": "2025-04-23 14:30:45",
  "user_id": 12345,
  "user_info": {
    "email": "[email protected]",
    "name": "Example User"
  },
  "stats": {
    "balance": 150.25,
    "total_delegations": 42,
    "total_energy_delegated": 5502000,
    "total_trx_spent": 235.75,
    "total_deposit": 500.00,
    "avg_rate_sun_energy": 425.32,
    "save_by_netts_percent": 28.45,
    "save_in_dollars": 12.35
  },
  "network_info": {
    "trx_price": 0.0849,
    "network_energy_fee": 0.000420
  }
}
Let's analyze this fragment in the same way as the previous one. It includes the following main parameters:
- request status ("success" or "error") –
status(string type); - response timestamp in the format "YYYY-MM-DD HH:MM:SS" –
timestamp(string type); - unique user identifier –
user_id(integer type); - user account information –
user_info(object type); - user statistics and usage data –
stats(object type); - current network parameters –
network_info(object type).
The type of the last three parameters is object, and therefore each of them contains additional parameters that interest us.
First, let's look at user_info. This object contains just two strings: email and name, the first of which is the email address, and the second is the username. It’s rather simple.
The situation is more complicated with the next object – stats. Let's analyze all 8 of its parameters:
- TRX account balance –
balance(number type) – shows the current available balance for Energy delegations; - total number of delegations Energy –
total_delegations(integer type); - general volume delegated Energy –
total_energy_delegated(integer type); - general amount of TRX spent on delegations Energy –
total_trx_spent(number type); - total amount credited to the account in TRX for all time –
total_deposit(number type); - average SUN rate per unit Energy –
avg_rate_sun_energy(number type); - percentage savings when using NETTS compared to freezing directly in the blockchain –
save_by_netts_percent(number type); - the amount saved using NETTS in US dollars –
save_in_dollars(number type).
Quite an informative object, isn't it?
As for the network_info object, it contains two numbers: trx_price and network_energy_fee: the first one tells the user the current price of TRX in US dollars, and the second one tells the user the current fee for Network Energy in TRX.
The request headers used will be the same as for the previous endpoint.
An example of Python code with correct request to get the above response in JSON format:
import requests
import json

# Request configuration
url = "https://netts.io/apiv2/userinfo"
api_key = "your_api_key"  # Your API key

headers = {
    "Content-Type": "application/json",
    "X-API-KEY": api_key,
    "X-Real-IP": "your_whitelisted_ip"  # IP from your whitelist
}

try:
    # Send GET request to the userinfo API
    response = requests.get(url, headers=headers, timeout=15)

    # Process JSON response
    if response.status_code == 200:
        data = response.json()
        print(json.dumps(data, ensure_ascii=False, indent=2))

        # Print user information
        user_info = data.get('user_info', {})
        print(f"\nUser: {user_info.get('name')} ({user_info.get('email')})")

        # Print statistics
        stats = data.get('stats', {})
        print(f"Balance: {stats.get('balance')} TRX")
        print(f"Total Energy Delegated: {stats.get('total_energy_delegated')}")
        print(f"Save by NETTS: {stats.get('save_by_netts_percent')}%")
    else:
        print(f"Error: {response.status_code}")
        print(response.text)

except Exception as e:
    print(f"An error occurred: {str(e)}")
As in the previous example, nothing complicated – the same headers, the same if/else block inside try/except.
The error response status codes for this endpoint are the same: 401, 403, 429, and 500. They are also supplemented by 404 – “user not found”. The JSON message looks the same as in /prices.
When using information received from the server, the following features should be taken into account:
- the
save_by_netts_percentparameter shows how much the user saves by using NETTS compared to freezing TRX directly on the Tron network; avg_rate_sun_energyis calculated as(total_trx_spent / total_energy_delegated) * 1,000,000;- All TRX amounts are shown with two decimal places;
- TRX price is displayed with 4 decimal places;
- network Energy charges are displayed with 6 decimal places for accuracy.
# 1-Hour Energy Order Endpoint
This endpoint is a bit more complicated, but not much. As usual, let's first look at the target response from the NETTS server with the information we need, confirming the top-up for 1 hour:
{
  "detail": {
    "code": 10000,
    "msg": "Successfully delegated 64000 energy, 12.25 TRX deducted",
    "data": {
      "provider": "energy_provider",
      "orderId": "ORD987654321",
      "balance": 100.5,
      "paidTRX": 12.25,
      "hash": [
        "0x1234567890abcdef1234567890abcdef1234567890abcdef1234567890abcdef"
      ],
      "request_id": 10584,
      "expiry": "2025-04-24 12:09:18"
    }
  }
}
This response lets you know that the replenishment of 64k Energy was successful (code 10000), 12.25 TRX were debited from the balance, order number - ORD987654321, etc. If you see this, then you have learned to replenish your Energy wallets in the most efficient way - by communicating directly with the NETTS server. Again, let's figure out this response point by point:
- container for response details –
detail(object type); - response code (10000 if successful) –
detail.code(integer type); - response message –
detail.msg(string type); - container for the rest of the information, which includes all the below parameters of this list –
detail.data(object type); - service provider used for energy delegation –
detail.data.provider(string type); - unique identifier of this order –
detail.data.orderId(string type); - the balance of your account BEFORE the amount spent is deducted –
detail.data.balance(number type); - the amount in TRX deducted for this order –
detail.data.paidTRX(number type); - hash(es) of transactions associated with this order –
detail.data.hash(array type); - internal request identifier –
detail.data.request_id(integer type); - Energy delegation expiration date (in the format "YYYY-MM-DD HH:MM:SS") –
detail.data.expiry(string type).
And, as usual, let's move on to the Python program that will allow us to receive the desired message from the server:
import requests
import json

# Request configuration
url = "https://netts.io/apiv2/order1h"
api_key = "your_api_key"  # Your API key

# Request payload
payload = {
    "amount": 64000,  # Amount of energy (32,000 to 131,000)
    "receiveAddress": "TXyz123AbCdEfGhIjKlMnOpQrStUvWxYz"  # TRON address for delegation
}

headers = {
    "Content-Type": "application/json",
    "X-API-KEY": api_key,
    "X-Real-IP": "your_whitelisted_ip"  # IP from your whitelist
}

try:
    # Send POST request to the order1h API
    response = requests.post(url, json=payload, headers=headers, timeout=15)

    # Process JSON response
    if response.status_code == 200:
        data = response.json()
        print(json.dumps(data, ensure_ascii=False, indent=2))

        # Extract key information
        detail = data.get("detail", {})
        result_code = detail.get("code")
        message = detail.get("msg")

        if result_code == 10000:
            order_data = detail.get("data", {})
            print(f"\nSuccess! Order Details:")
            print(f"Order ID: {order_data.get('orderId')}")
            print(f"Provider: {order_data.get('provider')}")
            print(f"Paid TRX: {order_data.get('paidTRX')}")
            print(f"Expiry: {order_data.get('expiry')}")
        else:
            print(f"Error: {message}")
    else:
        print(f"Error: {response.status_code}")
        print(response.text)
except Exception as e:
    print(f"An error occurred: {str(e)}")
Notice the changes compared to the previous fragments? Now before the request headers we also have a payload dictionary, which includes two new parameters: amount (integer) and receiveAddress (string). In the first one, you need to specify the amount of Energy that you want to rent for an hour — from 32k to 131k. In the second one, you will need to provide the address of the wallet that you want to charge with Energy.
In CURL, for example, the full request would look like this:
curl -X POST "https://netts.io/apiv2/order1h" \
  -H "Content-Type: application/json" \
  -H "X-API-KEY: your_api_key" \
  -H "X-Real-IP: your_whitelisted_ip" \
  -d '{
    "amount": 64000,
    "receiveAddress": "TXyz123AbCdEfGhIjKlMnOpQrStUvWxYz"
  }'
This endpoint also provides, in addition to the already familiar X-API-KEY, X-Real-IP and Content-Type request headers, two more optional ones: X-ORDER-ID for an individual order identifier and X-COST for a custom cost override (for specific cases). And Content-Type becomes strictly necessary for using this endpoint.
In terms of debugging and monitoring the smooth operation of the algorithm, this endpoint also has many changes. Now, each error status code is also supplemented with the error code itself:
400 -10Minimum amount of energy – 32,000;400 -11Maximum energy amount – 131,000;400 -2Insufficient funds in the account;400 -3Failed to perform TRON transaction;400 -12All delegation attempts failed;401 -1Invalid API key or IP address is not in whitelist;403 -2Your IP address is not whitelisted;429 -1Too many requests (rate limited).
As you can see, at this stage you will now be able to more accurately identify the specific problem. An example of a response with an error (the first one in the list in this case):
{
  "detail": {
    "code": -10,
    "msg": "Minimum energy amount is 32,000",
    "data": {}
  }
}
# Points to consider:
- Energy delegation is valid for exactly 1 hour from the moment of order;
- the cost of delegating electricity varies depending on the current market price and time of day;
- the system automatically optimizes your order for the best price and quality of service;
- if you need more power, consider placing multiple orders or using long-term delegation.
# Conclusion
If you have read carefully, now you can easily get detailed information about prices, user account and even top up any wallet with Energy for 1 hour for the amount you need — and all this without using visual interfaces, inside your own application in your preferred programming language. The possibilities for automation are now limited only by your imagination:
- write a program that monitors prices on the market and rents Energy itself at the right time;
- automate Energy rental for transactions to your clients' addresses or top up their wallets with Energy;
- transfer thousands of transactions per day if needed — thanks to NETTS API each of them will pass without burning TRX;
- resell Energy rented from NETTS automatically according to the schedule you need, described in your own code, etc.
As examples in this guide, we have provided fragments written in Python, since this language is the most popular and easy to learn. To see examples in JavaScript and PHP, follow this link:
https://doc.netts.io/api/examples.html#fetching-energy-prices (opens new window)
And if you are interested in a specific section of NETTS API, here you can find all of them in one place:
https://doc.netts.io/api/#overview (opens new window)
Enjoy your automation!